Mmmm! Here's another recipe that I haven't yet tried, but looks super easy! I'm thinking of trying it out this weekend. If I do, I'll post a comment to let you know how they turned out. Happy Halloween everyone!
Ingredients:
1 stick butter or margarine
1/2 c sugar
1 egg
1/2 c cooked pumpkin or pie filling
1/2 tsp vanilla
1 c all-purpose flour
1/2 tsp baking soda
1/4 tsp salt
1/2 tsp cinnamon
Directions:
Preheat oven to 375-degrees. Cream the butter and sugar together in a bowl. Add egg, pumpkin and vanilla. Sift dry ingredients together and add to bowl. Mix. Drop by tablespoon onto greased cookie sheet. Bake for about 15-minutes or until golden brown.
Friday, October 31, 2008
Wednesday, October 29, 2008
WFMW: Swivel Sweeper
 When my father-in-law came to visit last June, he bought us a Swivel Sweeper. Normally, I don't pay much attention to products that boast "As Seen on TV!" labels on them...but I must say, this particular product has made keeping our floors clean so easy!
We have wood floors throughout most of the main level of our home, so I'm always chasing after dust bunnies and crumbs left over by the kids that I babysit. The Swivel Sweeper makes it so easy to clean these things up without a lot of work or effort on my part.
I will say, though - the product says it can be used on both hard floors and carpet. I have found, however, that using it on the carpet does not work as well. Maybe that's just me? I still highly recommend the Swivel Sweeper, though!
Clean floors always work for me!
Monday, October 27, 2008
Continuing with Fall Clean-Up Ideas

With fall in full-swing, Jason and I are busy cleaning up our gardens and preparing them for winter. The idea that I want to share today is a short and easy one.
Behind our property, is a row of tall cottonwood trees. In the fall, they drop all of their leaves...right into our backyard! Raking them up is no fun, but we've recently learned how to use them to our benefit.
Instead of raking up the piles of leaves and disposing of them...we just rake them right into the vegetable garden. The fallen leaves provide protection from winter's harsh weather and come spring, we'll just move the leaves aside and tuck them around new plant growth to prevent weeds and to retain moisture. The leaves will eventually break down and nourish the soil.
What are you doing to prepare your yard for winter? I'd love to hear any tips you might like to share! Feel free to leave your comments.
A super easy idea that makes a big difference!
Friday, October 24, 2008
Pumpkin Spice Cake
Ingredients:
1/2 cup margarine, butter or shortening
1-1/4 cups sugar
2 eggs, beaten
2-1/4 cups flour
1-1/2 teaspoon baking powder
1/2 teaspoon baking soda
1 teaspoon salt
2 teaspoon cinnamon
1/2 teaspoon ginger
1/2 teaspoon nutmeg
1 cup pumpkin
3/4 cup milk
powdered sugar
Directions:
In a large bowl, cream the butter. Gradually add sugar and cream until light and fluffy. Blend in beaten eggs. Sift together the dry ingredients. Combine pumpkin and milk. Add dry ingredients alternately with pumpkin mixture.
Pour into a bundt pan and bake at 350* for approxmiately 30 minutes. Let cool for 1 hour.
Drizzle with sugar glaze (1 cup powdered sugar with 1 tablespoon milk, mixed until smooth.)
Wednesday, October 22, 2008
WFMW: Extending the Life of Jack-O-Lanterns

I am pleased to say that Fall has arrived here in the Midwest! It’s definitely my favorite time of year, as I enjoy cooler temperatures, bright yellow mums…and pumpkin carving!
It may not always look like it, but a lot of time and effort goes into carving my pumpkins. (My pumpkins usually need extensive repair done to them before they’re ready to light up the front porch!) You can imagine my disappointment then, when just days later, my jack-o-lantern is showing signs of mold and shriveling. Thankfully, a friend gave me a tip to help extend the life of my jack-o-lanterns.
Try spraying your finished jack-o-lantern with a diluted bleach solution to prevent mold. Then, to keep the cut edges from getting that shriveled-look, apply a thin layer of petroleum jelly.
Sounds easy enough! Enjoying my pumpkin display longer is what works for me!
Monday, October 20, 2008
Planning Ahead with Plant Markers
 As much as I enjoy the fall season, it is always sad to see my butterfly garden wither away as it prepares for winter. One thing I plan to do differently this year, is to mark each plant before it becomes unrecognizable. (I wish I had done this last year - it would have made planning the addition of more plants much easier!)
Using the abundance of paint sticks that we have accumulated over the years from all of our paint projects, I broke each one in half and wrote the name of the plant with permanent marker on the stick and placed it in each plant area. This will enable me to have a much better idea of what plants I have and how much room will be available if I choose to add more to the garden next year.
Note: Don't have any paint sticks readily on hand? Most home improvement stores will hand them out free-of-charge, if you ask. You could also use smooth river rock as an alternative plant marker, too!

Tuesday, October 14, 2008
Food Friday: Turtle Pumpkin Pie
Did anyone happen to see this recipe in the November issue of Woman's Day? I haven't tried it out yet, but I think this would make a great dessert idea for Thanksgiving! It definitely looks easy enough.
Ingredients:
1/4 cup plus 2 Tbsp. caramel ice cream topping, divided
1 HONEY MAID Graham Pie Crust
1/2 cup plus 2 Tbsp. PLANTERS Pecan Pieces, divided
1 cup cold milk
2 pkg. (3.4 oz each) JELL-O Vanilla Instant Pudding
1 cup canned pumpkin
1 tsp. ground cinnamon
1/2 tsp. ground nutmeg
1 tub (8 oz) COOL WHIP Whipped Topping, thawed, divided
Directions:
Pour 1/4 cup caramel topping into crust; sprinkle with 1/2 cup pecans.
Beat milk, pudding mixes, pumpkin and spices with whisk, until blended. Stir in 1 1/2 cups COOL WHIP. Spread into crust.
Refrigerate at least 1 hour. Top with remaining COOL WHIP, caramel topping and pecans just before serving. Makes 10 servings.
WFMW: Cleaning Ceiling Fans
Ugh! Dusting is probably one of my least favorite house chores. Dusting ceiling fans, I dread even more! (I admit, I probably only get around to doing this about 4 times a year! YIKES!) But if I have to do it, at least I found a way to do it fast and without making a mess.
I can't remember where I learned to do this, but I take an old pillowcase and wrap it around each fan blade, while wiping the dust off. The dust falls inside the pillowcase, instead of all over the floor and couch and when I'm done, I just throw the pillowcase in the washer. It's seriously so easy, I'm done in 5-minutes or less!
3 fans x 5 minutes each x 4 times a year= 1 hour of dusting ceiling fans a year! That totally works for me!
Monday, October 13, 2008
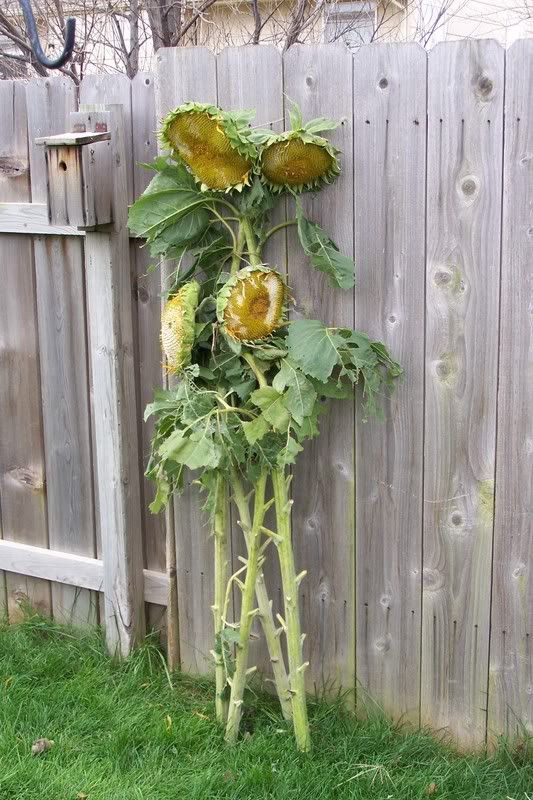
Sunflowers Are for the Birds!
 I think the sunflowers that we planted have just about had it! They were nice while they lasted, though. Jason was going to cut them down but we came up with another idea, instead. I thought it was worth sharing on here.
With cooler weather on its way, we cut and bundled our sunflowers together with twine and propped them up in our yard to use as natural bird-feeders. As the giant heads continue to dry out, producing sunflower seeds...it will give the birds in our area quite the feast! (And hopefully, we'll benefit by seeing some interesting birds!)
If you're interested in seeing more pictures, check out our Garden Photo Journal.
Friday, October 10, 2008
Food Friday: Pumpkin Dessert
Continuing with the pumpkin recipes, I'd like to post one that my sweet mother-in-law shared with me:
Ingredients:
1 15-oz can pumpkin
1 12-oz can milk
3 eggs
1 cup white sugar
4 teaspoons pumpkin pie spice
Directions:
Mix above ingredients well and pour into a 9x13 cake pan.
Sprinkle 1 yellow cake mix (dry) over pumpkin filling. Pour 3/4 cup melted butter over cake mix. Sprinkle 1 cup chopped nuts on top.
Bake 45 minutes to an hour at 350*. Serve warm or cold with Cool Whip or ice cream.
Wednesday, October 8, 2008
WFMW: Free (Almost New) Books!

My husband and I love to read! Unfortunately, affording to buy brand-new books from the book store has been one of the things we’ve had to sacrifice since we’ve started cutting back on our budget.
Thankfully, we’ve discovered paperbackswap.com. It allows us to post books to their website that we no longer want and swap them for ones we do want. It’s free to sign up and to swap books. (NOTE: You do have to pay for shipping when someone requests one of your books, but you do not have to pay shipping costs when someone mails a book to you.)
Additionally, they have sister sites that apply the same concept to swapping CDs and DVDs.
This has been a great way for us to save money…and that always works for me!
Monday, October 6, 2008
My Best Resource for Easy, Cheap Tips

I'd love to say that I know everything there is to know about gardening. Heck, I'd love to say that I know one-third of everything there is to know about gardening! But, having only been gardening for less than 5 years, it's apparent that I have a lot of catching up to do before declaring myself a seasoned gardener.
I like to spend the winter months researching and reading about gardening. It's hard to know where to start though, given that there are hundreds of thousands of books, magazines and other materials all aimed at teaching the unlearned-gardener how to grow vegetables, flowers and herbs! And honestly, a lot of the sources that I've read make gardening sound complicated and very expensive.
However, I have found a magazine that actually makes gardening sound easy and affordable! Are you ready for my money-saving, knowledge-increasing all-time favorite magazine subscription? (Sorry...didn't mean to get carried away there!)
We subscribe to Backyard Living and it costs us about $13.00 for a 2-year subscription (12 issues). They have such great penny-pinching ideas though, that it makes the subscription worthwhile. Backyard Living features sections like: Yard Smarts that Work, The Frugal Gardener (my husband really likes that section!), Budget Backyard Makeover and other articles that can truly benefit the novice gardener.
So anyway, that's my big tip! If you are interested in reading through a copy of Backyard Living, leave a comment with your e-mail address and I can sign you up to receive 1 free issue.
Want to share some of your favorite gardening references and know-how? Comments are most welcome!
Friday, October 3, 2008
Food Friday: Pumpkin Bread
I can't believe it's October already! But I'm glad - Fall is my favorite time of the year! This month, I am going to share my favorite recipes that include pumpkin, starting with my pumpkin bread recipe. Enjoy!
Ingredients:
3 cups canned pumpkin puree
1-1/2 cups vegetable oil
4 cups white sugar
6 eggs
4-3/4 cups all-purpose flour
1-1/2 teaspoons baking powder
1-1/2 teaspoons baking soda
1-1/2 teaspoons salt
1-1/2 teaspoons ground cinnamon
1-1/2 teaspoons ground nutmeg
1-1/2 teaspoons ground cloves
Optional Ingredients: Add raisins, mini chocolate chips, pecans or walnuts.
Directions:
Preheat oven to 350*F. Grease and flour three 9x5-inch loaf pans.
In a large bowl, mix together the pumpkin, oil, sugar and eggs. Combine the flour, baking powder, baking soda, salt, cinnamon, nutmeg; stir into the pumpkin mixture until well blended.
Divide the batter evenly between the prepared pans.
Bake in preheated oven for 45-minutes to 1-hour. The top of the loaf should spring back when lightly pressed.
Wednesday, October 1, 2008
WFMW: Cheap Snack Containers

The idea I have is very simple and I’m certain I am not the first one to think of this:
I babysit small children, including some that are still eating baby food. When I am finished feeding the kids, I like to keep the plastic containers that their food comes in (e.g. Gerber’s 1st Foods, etc.) They make great snack containers for when I am packing my husband’s lunch. Some foods that these containers work well for include: nuts, cheezits and small candy. Since they are reusable, it saves me from having to use Ziploc bags each time. And the containers are compact enough that they fit easily into the smallest of lunch boxes.
I also use these small containers to organize our junk drawer in the kitchen. They are perfect for holding screws, beads, thumbtacks etc. Upon opening the drawer, I can see at a glance where everything is!
The list of ideas for using these small containers is endless…and that works for me!
Thanks for reading!
Subscribe to:
Posts (Atom)
.JPG)


